
Planning a trip to Vietnam?
Before you fly, there is one more online immigration step you should know about: the Vietnam Pre-Arrival Information (PAI) declaration.
The system allows foreign travelers to submit their passenger, passport, visa and travel information before arriving in Vietnam. After completing the declaration, the system generates a confirmation QR code that you can save on your phone and use during the immigration process.
For Filipino travelers, this is separate from applying for a Vietnam visa. Philippine ordinary passport holders are generally eligible for visa-free entry to Vietnam for up to 21 days, provided they meet the applicable visa-exemption conditions.
Here is a step-by-step guide on how to complete the Vietnam Pre-Arrival Information declaration.
Important: Use Only the Official Website
Always use the official Vietnam Immigration Department Pre-Arrival Information portal when completing the form.Official portal: prearrival.immigration.gov.vn
Be careful when searching for the website online. Vietnam's immigration authorities have warned about fake websites that may attempt to collect payment or personal information.
The pre-arrival declaration is an immigration information submission and should not be confused with a Vietnam e-visa application.
When Should You Complete the Pre-Arrival Declaration?
The current guidance allows travelers to complete the declaration within three days before their arrival, or upon arrival where applicable.
Vietnam has been expanding the system to major international airports, including airports in Ho Chi Minh City, Da Nang, Hanoi, Nha Trang and Phu Quoc.
Because immigration procedures can change, I recommend checking the official portal again before your flight.
Step 1: Go to the Official Website
Make sure you are using the official prearrival.immigration.gov.vn domain and NOT a third-party website.
- Open the official Vietnam Pre-Arrival Information website.
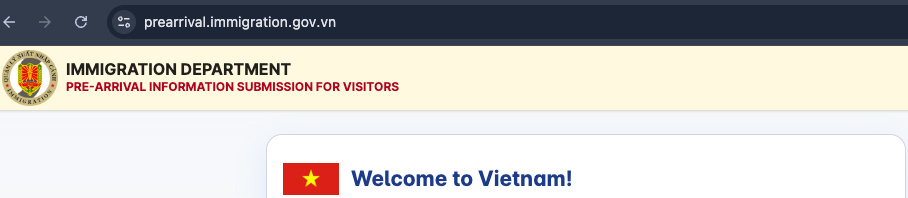
2. Select "Create & Submit Pre-arrival Information" to start your declaration.

Step 2: Choose Your Nationality
- Select your nationality from the list.
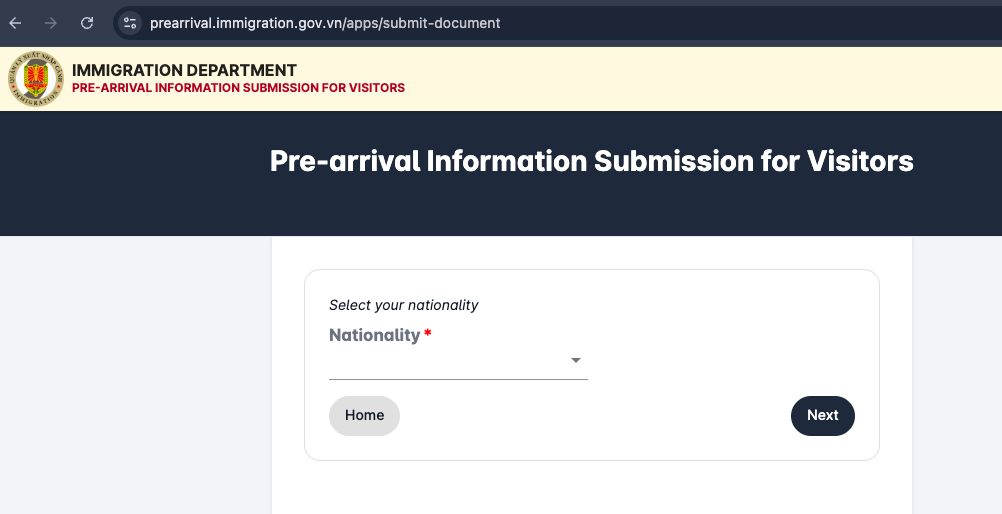
2.If you are traveling using a Philippine passport, select Philippines.
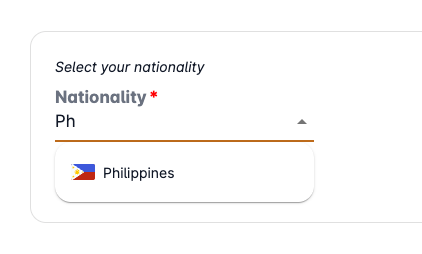 Make sure the nationality you select matches the passport you will use to enter Vietnam.
Step 3: Choose Your Arrival Date
1.Select your expected arrival date in Vietnam.
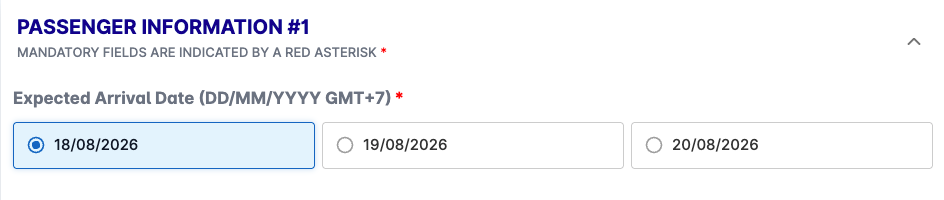
One important thing to remember is that the system only allows dates within the applicable pre-arrival window. If your trip is still several weeks away, you may need to wait before completing the declaration.
It is best to complete this close to your travel date rather than trying to submit it too early.
Step 4: Fill Out Your Passport Details
Next, enter your passport information. You will need to provide details such as:
- Passport type
- Passport number
- Passport expiry date
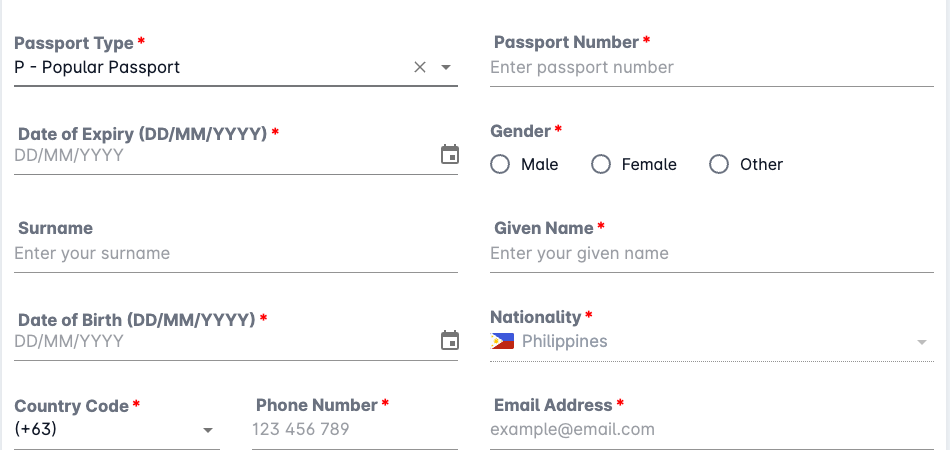
For travelers using an ordinary Philippine passport, select the POPULAR PASSPORT option displayed by the portal. You do not need to treat this as an e-visa application. Follow only the information requested by the Pre-Arrival Information form.
Tip: Double-check your passport number and expiry date before continuing. Even a small mistake in your passport information can cause problems during immigration processing.
Step 5: Choose the Appropriate Visa Type or Purpose
This section is important.
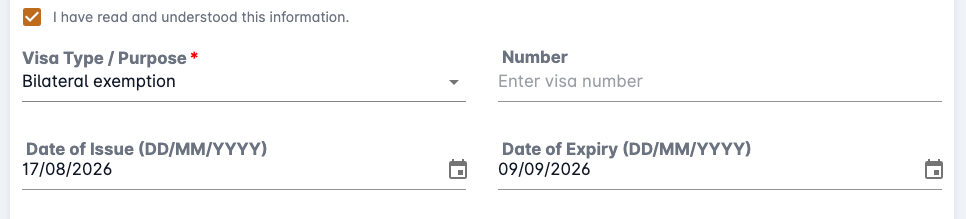
If you are a Filipino traveler entering Vietnam under the applicable visa-exemption arrangement, choose the appropriate “Bilateral Exemption” option shown on the form. For the Date of Issue, you can enter a date prior to the day you are completing the form. Do not enter visa information that does not apply to you. If you are traveling with an e-visa or another type of visa, select the option corresponding to your actual immigration status.
Step 6: Add Other Passengers if You Are Traveling With Family
If you are traveling with family members, you may use the "Add Passenger +" option when applicable.
If you are completing the declaration only for yourself, you can proceed to the trip information section.
Make sure each traveler's information is accurate.

Step 7: Select the Country You Are Traveling From
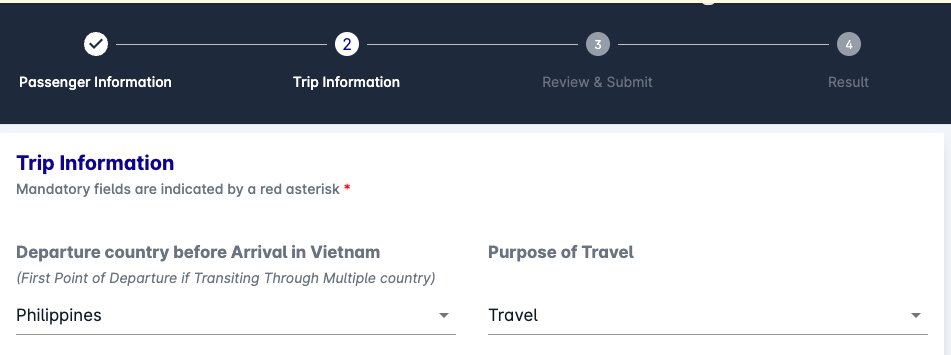
You will then be asked for your departure country before arriving in Vietnam. This is especially important if you have a connecting flight. For example, if your trip is:
Manila → Singapore → Da Nang your departure information may need to reflect the applicable first point of departure or transit information requested by the form. Follow the wording shown on the portal carefully, particularly if you have multiple flight segments.
Step 8: Enter Your Flight Details
Enter your flight information, including your flight number and arrival airport/border gate.
If you are not sure about your flight number, check your:
- Airline booking
- E-ticket
- Itinerary receipt
- Airline app
For example, if your flight is listed as 5J0751, enter the flight number exactly as shown in your booking.
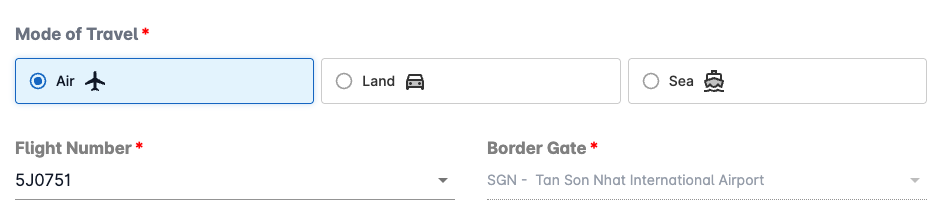
Tip:Don't guess your flight number or airport. Check your actual ticket before submitting the form.
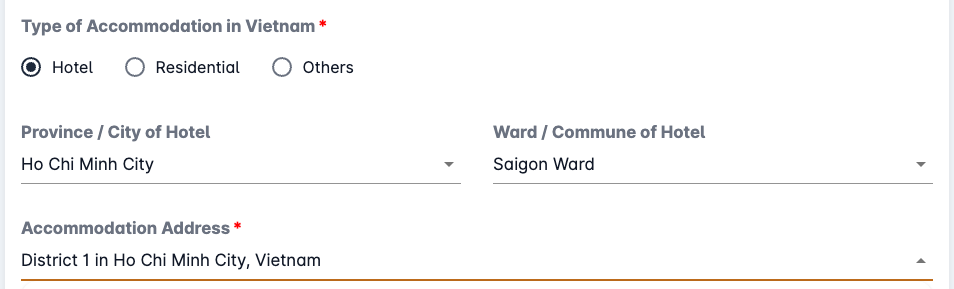
Step 9: Fill Out Your Accommodation Details
Next, provide your accommodation information.
Depending on the form, you may be asked for:
- Province/City
- Ward/Commune
- Accommodation address
The easiest way to complete this section is to open your hotel booking confirmation and copy the address from there. If you are staying at a hotel, make sure you enter the address of the hotel where you will actually be staying in Vietnam. If you are unsure about the ward or commune, check the hotel's official address or a reliable map service rather than guessing.
Step 10: Enter Your Departure Date and Submit
Finally, enter your expected departure date from Vietnam.

Before clicking "Review & Submit," take a moment to check everything:
- Name
- Nationality
- Passport number
- Passport expiry date
- Arrival date
- Flight number
- Arrival airport
- Accommodation details
- Departure date
Once everything is correct, submit the declaration.
After successfully completing the process, the system will generate a confirmation QR code.
Save Your QR Code
Take a screenshot of the QR code and keep it somewhere easily accessible on your phone.
I also recommend keeping a backup copy, especially if you are traveling with limited internet access.
You may also print it if you prefer having a physical copy of your travel documents.
What You Should Prepare Before Filling Out the Form
To make the process faster, have these ready before you start:
- Your valid Philippine passport
- Your passport number and expiry date
- Your Vietnam arrival date
- Your flight number
- Your arrival airport
- Your complete hotel or accommodation address
- Your departure date from Vietnam
- Your connecting flight information, if applicable
- Your visa or visa-exemption information
Having these details ready means you won't have to stop halfway through the form to search for your booking information.
Do Filipinos Need a Visa for Vietnam?
For ordinary Philippine passport holders, Vietnam's official visa-exemption list currently provides visa-free entry for stays of up to 21 days, subject to the applicable conditions.
The official list states that Philippine ordinary passport holders must have a passport valid for at least six months and meet the applicable entry conditions, including having a return or onward ticket.
If you plan to stay longer than the visa-free period, or if your travel circumstances do not qualify for the exemption, check Vietnam's current visa requirements before booking your trip.
Remember that the Pre-Arrival Information declaration is not a visa. Completing the declaration does not replace a visa if your trip requires one.
Is the Vietnam Pre-Arrival Form the Same as an E-Visa?
No.
These are two different processes.
The Pre-Arrival Information declaration collects your travel and immigration information before arrival.
The Vietnam e-visa is an actual visa issued by Vietnam's Immigration Department for travelers who require one.
If you are eligible for visa-free entry as a Filipino traveler, you generally do not need to apply for an e-visa for a stay within the permitted visa-exempt period.
Is the Pre-Arrival Declaration Free?
The official Pre-Arrival Information portal is an immigration information service.
Be very careful with websites that ask you to pay simply to complete the declaration. Vietnam's authorities have warned travelers about fraudulent websites impersonating official immigration services.
Always check that you are on the official immigration.gov.vn domain.
What Happens After I Submit the Form?
After successfully submitting your information, the system generates a confirmation QR code.
Save the QR code on your phone before leaving the website.
You can also take a screenshot so that you have an offline copy in case your mobile data or Wi-Fi connection is unavailable when you arrive.
My Tips Before Flying to Vietnam
The Pre-Arrival Information form is fairly straightforward, but the best way to avoid problems is to prepare your information before opening the website.
My biggest tips are:
1. Don't wait until you're at the airport.
Complete the declaration within the permitted timeframe before your arrival whenever possible.
2. Double-check your passport details.
Your passport number and expiry date should match your actual passport.
3. Check your flight booking.
Don't guess your flight number or arrival airport.
4. Keep your hotel confirmation nearby.
You will need your accommodation details, so having your booking confirmation ready will make this much easier.
5. Save your QR code.
Take a screenshot after submitting the form.
6. Use only the official website.
Avoid websites offering "paid assistance" or charging you to complete the declaration.
7. Check the rules again before your trip.
Vietnam's immigration procedures can change, especially as the Pre-Arrival Information system continues to be rolled out.
Final Thoughts
If you're traveling to Vietnam soon, I recommend completing the Pre-Arrival Information declaration before your flight so you already have your information submitted when you arrive.
The process only requires basic passenger, passport and travel information, but having everything prepared beforehand can make the immigration process less stressful.
And most importantly, always use the official Vietnam Immigration Department website and check the latest requirements before your trip.
Safe travels and enjoy Vietnam!
Official Resources
Vietnam Pre-Arrival Information:
prearrival.immigration.gov.vn
Vietnam Immigration Department / E-Visa Portal:
evisa.immigration.gov.vn
Travel requirements and immigration procedures may change without prior notice. Always verify the latest requirements through Vietnam's official immigration authorities before traveling.